Restore WordPress Web site Project from XAMPP to Linux Mint hosting platform
I have this really old mini PC with an AMD A8-7410 and Radeon R5 graphics for aout 10 years. Honestly, it still runs well enough that I just couldn’t bring myself to toss it in the trash. I figured it’d be perfect for things like photo slideshows, watching movies, or even hosting my WordPress website project. So, I decided to move the WordPress site from XAMPP on Windows over to it.
I thought it’d be a pretty quick and simple task—something I could knock out in no time. Especially with the help of AI tools like ChatGPT, Claude, DeepSeek, and so on. But to my surprise, it ended up taking around four days. I never expected to put in that much effort and time. That’s exactly why I think this post is still worth sharing, even with all the AIs out there.
In this post, I’ll walk you through the method I used, the challenges I encountered along the way, and how I managed to overcome them. Alright, let’s dive in!
Quick take away
Technically, the task is fairly straightforward. The steps I followed are as follows:
- Building a Hosting Environment : Set up a hosting environment for a WordPress website on Linux Mint. This involves installing Apache, PHP, and MySQL—three essential components or services.
- Exporting the Database Backup : Export a backup of the website’s database as an .sql file.
- Importing the Backup Database : Import the backup database into MySQL on Linux Mint.
- Configuring Related Properties : Adjust all related settings to ensure the hosting environment on Linux Mint can communicate with the WordPress website instance. For example, the WordPress instance must be able to interact with the database that has been migrated to MySQL on Linux Mint.
Building the WordPress Website hosting on Linux Mint
This task is quite simple, actually—you only need two lines of commands to get the job done. If you’re like me—an entrepreneur who invests money from your own wallet rather than a technical expert—then you’ll want to understand exactly what you’re doing.
Below are the key components you’ll be installing. I found the explanations provided by ChatGPT very helpful, so I’m keeping them here:
- Installing a web server:
- apache2: Installs the Apache web server, which serves web pages to users.
- Installing the PHP scripting language platform:
- php: Installs PHP, a popular server-side scripting language used for web development.
- libapache2-mod-php: Enables Apache to process PHP scripts, allowing for dynamic web content.
- Installing the database engine and service:
- mysql-server: Installs MySQL, a relational database management system used to store and manage website data.
- php-mysql: Provides PHP with the necessary extensions to interact with MySQL databases.
Now, let’s begin. On your Linux Mint device, open the terminal. You can do this by clicking the terminal icon in the bottom-left corner or by pressing Ctrl + Alt + T on your keyboard.
In the terminal, enter the following two lines of commands to complete the setup:
- First, ensure your Linux Mint system is updated and ready for new installations
sudo apt update && sudo apt upgrade- Next, install all the required web hosting components:
sudo apt install apache2 mysql-server php libapache2-mod-php php-mysql- Finally, secure your MySQL installation by running the following command. This will apply essential security measures such as setting a root password, removing anonymous users, disabling remote root login, and removing the test database:
sudo mysql_secure_installationWell done! You have now successfully set up a web hosting environment on Linux Mint.
Creating a backup database of the WordPress Website
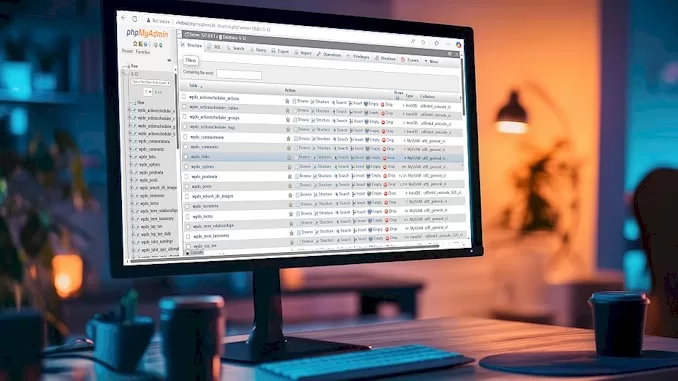
As mentioned earlier, my goal is to migrate the WordPress website currently hosted on XAMPP to a hosting environment on Linux Mint. The first step in this process is to create a backup of the website’s database. This can be accomplished by exporting an .SQL file via phpMyAdmin, the interactive interface for managing MySQL in XAMPP.
Let’s begin:
- Access phpMyAdmin:
- Ensure your XAMPP instance is running, with both Apache and MySQL active in the XAMPP Control Panel.
- Open a browser and navigate to http://website/phpmyadmin (replace “website” with your server’s domain or hostname).
- Select the Database:
- In phpMyAdmin’s left-hand panel, you’ll see a list of available databases.
- Click on the database you wish to export. This will load its tables into the main panel.
- Navigate to the Export Tab:
- At the top of the interface, locate and click the “Export” tab.
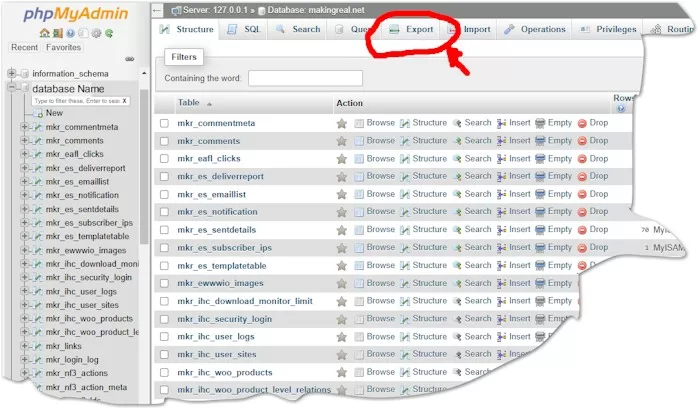
- Choose Export Method:
- phpMyAdmin offers two export methods:
- Quick: The simplest option, using default settings.
- Custom: Provides more control, allowing you to select specific tables, output formats, and other settings.
- For a basic backup, the “Quick” method is usually sufficient.
- phpMyAdmin offers two export methods:
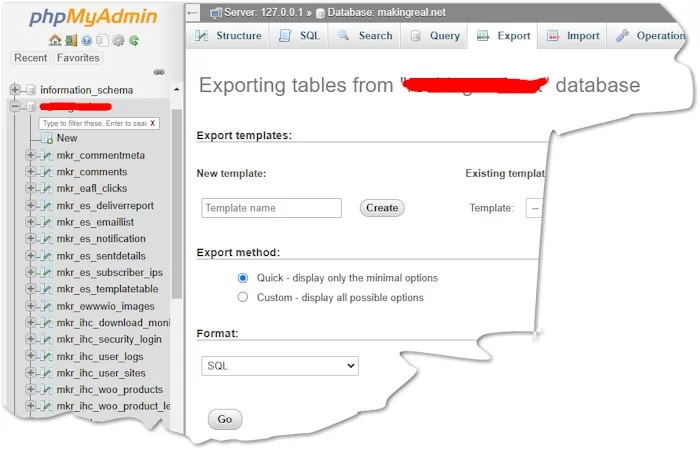
- Select the Format:
- Ensure the export format is set to “SQL”, the most widely compatible format for database backups.
- Initiate the Export:
- Click the “Go” button at the bottom of the page.
- Your browser will prompt you to download the backup file (typically with a .sql extension).
- Save the file to a secure location on your computer.
It’s quite simple, but if you’ve never done it before, you might find it a bit challenging. In that case, be sure to follow the instructions above carefully. Even though I’m well-versed in these technical concepts and have years of IT experience, I still made a mistake on this task since I’m not very experienced with phpMyAdmin-I accidentally exported the entire database instead of just the one for the website.
Importing the backup database to Mysql on Linux Mint
Restoring a database from a backup typically involves creating a new database and then importing the backup into it. Sounds simple, right? However, if you’ve never done it before in this specific environment, you may encounter several obstacles that can leave you stuck for hours—or even days.
I struggled with this step for nearly two days, unable to get the expected results—even with ChatGPT’s help—because I had never done it on Linux before. Frustrated, I turned to Deepseek and managed to complete the task in less than a minute.
Here’s the simplest and most reliable way to get it done successfully.
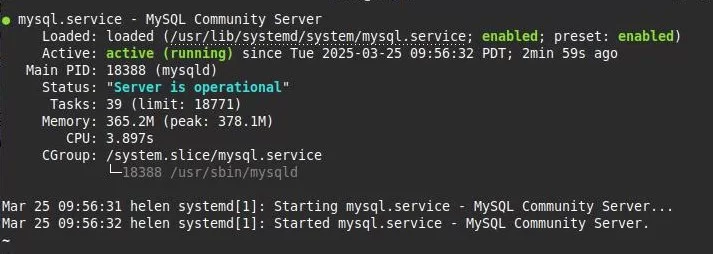
- First, using this command to make sure your mysql is running properly:
systemctl status mysqlIf you see a result similar to the one below, MySQL is functioning correctly, and you can proceed to the next step.
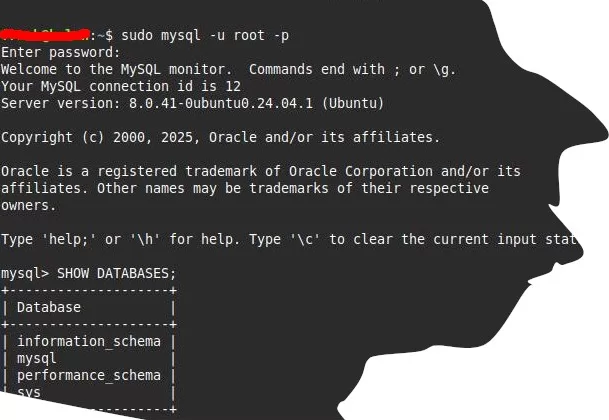
- Open the terminal and enter the following command to log into MySQL:
sudo mysql -u root -pWhen prompted, enter the password for the root account—the one you set during MySQL installation in the previous step. You can refer to the screenshot below for guidance.
You can use the screenshot below for your reference:
- Once logged into MySQL, you’ll create a new database and a new user account. This account will be used both for importing the backup and for connecting your WordPress website to the database. Use the following commands:
CREATE DATABASE wordpress_db;
CREATE USER 'wordpress_user'@'localhost' IDENTIFIED BY 'your_password';
GRANT ALL PRIVILEGES ON wordpress_db.* TO 'wordpress_user'@'localhost';
FLUSH PRIVILEGES;
EXIT;- Now, log into MySQL using the newly created account:
sudo mysql -u wordpress_user -p- After logging in, you’ll be acting on behalf of this user to import the backup into the new database. Use the following command:
# Switch to the target database
USE wordpress_db;

# Import the .sql file from within MySQL
SOURCE /path/to/your-backup.sql;
Once you receive a success message indicating that the import was completed, take a moment to congratulate yourself! You’ve just accomplished one of the most important and challenging steps in setting up your database.
From here, the remaining tasks are much simpler and more straightforward.
Configuring all related properties
At this stage, only one final task remains: integrating your WordPress website installation with the newly created environment on Linux Mint.
In my case, I prefer to keep my WordPress instance on an external disk drive for added flexibility. So, in this guide, I’ll walk through the process based on that specific setup. Let’s get started.
- At first, I’ll mount the external USB driver into Linux Mint system.
- Insert the external disk drive into a USB slot on your Linux Mint device.
- Open the terminal and enter the following command to identify the external USB drive:
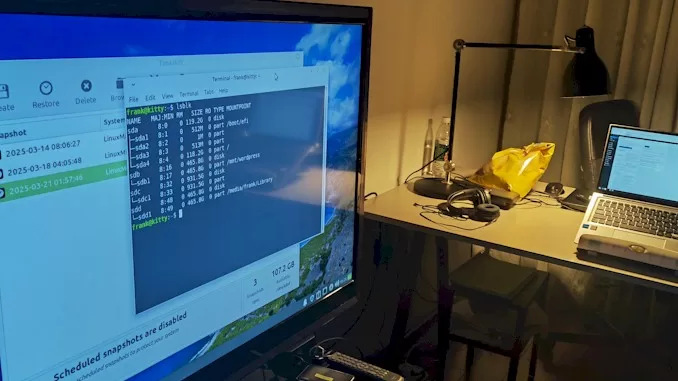
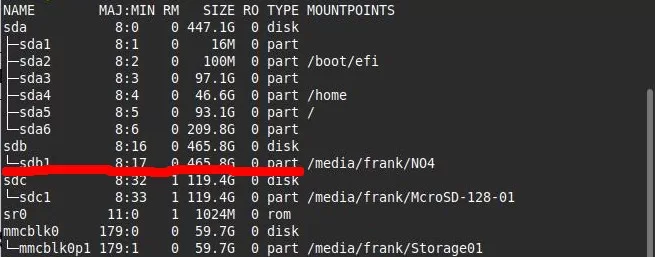
sudo lsblkThe output will display connected storage devices. For example, my external USB drive appears as sdb1, and my WordPress website folder /mywebsite is stored on it.
- Now, create a Mount Point: First, create a directory where the USB drive will be mounted:
sudo mkdir /mnt/wordpress- Mount the USB Drive: Next, mount the USB drive to the newly created directory:
sudo mount /dev/sdb1 /mnt/wordpressSince the folder of WordPress website /mywebsite is at root of the USB driver, when you need to refer to it on the Linux Mint device, you should use the path: /mnt/wordpress/mywebsite.
Since my USB drive uses the NTFS file format, I specify it explicitly in the command.
sudo mount -t ntfs-3g /dev/sdb1 /mnt/wordpressOkay, the first step has been finished. Let’s verify the job has been done as expected. The following command displays information about the available and used disk space on the file system.
df -h- At this task, you’ll make sure that the web server has the correct permissions to access the files in WordPress folder on the USB Drive. Running following comands:
sudo chown -R www-data:www-data /mnt/wordpress
sudo chmod -R 755 /mnt/wordpress- Create a Symbolic Link: Since I keep the files of WordPress website on the USB drive, and I want to make them accessible from /var/www/html, the place where any web server (like Apache or Nginx) serving files from. So I need to create a symbolic link by issuing the command below, then they will actually serve files from /mnt/wordpress/mywebsite.
sudo ln -s /mnt/wordpress /var/www/html/mywebsite- Create a new Apache configuration file for your WordPress site: running the command to create and edit the configuration file:
sudo nano /etc/apache2/sites-available/mtwebsit.confin the nano edit tool, copy and paste the following configurations:
<VirtualHost *:80>
    ServerAdmin [email protected]
    DocumentRoot /mnt/wordpress/mywebsite
    ServerName mywebsite.local
    ServerAlias www.mywebsite.local

    <Directory /mnt/wordpress/mywebsite>
        Options FollowSymLinks
        AllowOverride All
        Require all granted
    </Directory>

    ErrorLog ${APACHE_LOG_DIR}/error.log
    CustomLog ${APACHE_LOG_DIR}/access.log combined
</VirtualHost>
Then, running these commands to enable the site and reload Apache:
sudo a2ensite mywebsite.conf
sudo systemctl reload apache2- Finally, the last task! That is to make sure all configurations in wp-config.php in the WordPress website folder fit the new environment by update it. The main configurations you’ll update are the connection to the database. The same, I use nano to edit the file:
sudo nano /mnt/wordpress/mywebsite/wp-config.phpIn wp-config.php, finding the configurations about the database connection as following, then update them accordingly.
define('DB_NAME', 'wordpress_db');
define('DB_USER', 'wordpress_user'); // the new account you created in mysql
define('DB_PASSWORD', 'wordpress_user_password');
define('DB_HOST', 'localhost');- The last touch. Wait, there is an important task you need to take on in order to make your restored website works properly: get its domain name solved in the local network.
Here’s why: Previously, I accessed the website on XAMPP using the URL http://website.local. Now, the web server has been moved to a Linux Mint device with a different IP address on the local network. However, I need to continue using the same name (http://website.local) to access the website because this name is already recorded in a specific table in the database. If I were to use the new device’s hostname or IP address instead, it wouldn’t match the database record, causing the website to malfunction.
Getting http://website.local to Resolve on the Local Network
Now that the web server is running on a Linux Mint device with a different IP address, I need to ensure that http://website.local still resolves correctly. There are two ways to achieve this:
- Adding a DNS entry in the OpenWRT router (recommended for all devices on the network).
- Modifying the hosts file on individual devices (useful if you don’t have an OpenWRT router).
Configuring DNS in OpenWRT Router
Since my network is managed by an OpenWRT router, I can configure a static DNS entry to point website.local to the new server’s IP address. This way, any device connected to the network will automatically resolve the correct address.
Here is how to do it in steps:
- Access the OpenWRT web interface by opening a browser and going to http://192.168.1.1 (or your router’s IP).
- Log in using the administrator credentials.
- Navigate to Network → DHCP and DNS.
- Scroll down to the Hostnames section and click Add.
- Enter: Hostname: website.local, IP Address: (Replace this with the Linux Mint device’s IP, e.g., 192.168.1.100)
- Click Save & Apply to confirm the changes.
To apply the new settings, restart the dnsmasq service in OpenWRT by running the following command via SSH:
/etc/init.d/dnsmasq restartAlternatively, a simple router restart will also apply the changes. After this, any device on the local network should be able to access http://website.local without issues.
Modifying the Hosts File (For Individual Devices)
In case you don’t have the OpenWRT router, you can manually configure each device by adding an entry to the hosts file. This forces the system to resolve website.local to the correct IP.
On Windows:
- Open Notepad as Administrator.
- Navigate to File → Open, then go to C:\Windows\System32\drivers\etc\hosts. At the bottom of the file, add this line:
192.168.1.100 website.local
(Replace 192.168.1.100 with the actual IP address of the Linux Mint server.)- Save the file and restart the browser.
On Linux or macOS:
- Open a terminal and edit the hosts file:
sudo nano /etc/hosts- Add this line at the bottom:
192.168.1.100 website.local- Save and exit (Ctrl + X, then Y, then Enter).
- Clear the DNS cache to apply changes:
sudo systemctl restart nscd # this is fot Linux
sudo dscacheutil -flushcache && sudo killall -HUP mDNSResponder # thi is for macOS
With this setup, your local machine will correctly resolve http://website.local to the new server.
To keep things simple, in case you have the OpenWRT router, it would be better to use the OpenWRT DNS method, as it ensures all devices on the network resolve http://website.local without extra configuration. However, if router access isn’t an option, the hosts file method works just as well for individual machines.
Now, I can access my website seamlessly, just like before.
Now, all tasks that needed to restore the WordPress website to the new Linux Mint environment have been done successfully. You can access the website by typing in http://mywebsite.local in the address bar of the browser.
The Challenges I Faced
I never expected to face so many obstacles when I decided to migrate my website project to an old AMD A8-7410-based mini PC running Linux Mint. It ended up costing me a lot of time to troubleshoot and work around issues. If I had known this beforehand, I would never have taken on the task of moving the website to a Linux-based hosting environment—I would have just left it on XAMPP.
That said, I’ve finally completed the migration, and I’ve learned a lot along the way. Here are two key lessons worth sharing:
Can’t access any pages other than the home page
Finally, the homepage of my website project appeared before me. However, to my surprise, while the homepage loaded correctly, all other pages threw the infamous 404 error and wouldn’t function properly. I had never encountered this issue before, so I panicked a little.
Fortunately, the fix was simple! The problem was caused by the mod_rewrite module in Linux, which wasn’t running. Since WordPress relies on Apache’s mod_rewrite for clean permalinks, a disabled module results in posts and pages returning 404 errors.
To confirm that mod_rewrite wasn’t enabled, I ran the following command:
sudo apache2ctl -M | grep rewriteOnce I confirmed that the module was inactive, I enabled it using:
sudo a2enmod rewrite
sudo systemctl restart apache2
And just like that—ta-da!—all pages worked perfectly.
Unexpected Issue: DNS Works on Windows but Not on Linux
As I mentioned in the previous section, I configured DNS on the OpenWRT router to resolve http://website.local on the local network. But guess what I ran into?
After completing the DNS configuration, I decided to test it. On Windows, I opened the command line and ran:
ping website.localIt worked perfectly! The command returned the correct IP address of the web server: 192.168.1.x.
However, when I tested the same command in the terminal on my Linux devices, I got this error:
ping website.local
ping: website.local: Name or service not known
Now I needed to figure out why Linux wasn’t recognizing the hostname, even though it worked fine on Windows.
After spending about an hour troubleshooting the problem with ChatGPT, I realized it couldn’t help me resolve the issue, so I decided to try Deepseek.
With the same prompt, Deepseek immediately identified the root cause in its first response. It suggested checking the nsswitch.conf file and ensuring that DNS prioritizes mdns4_minimal.
When I inspected the nsswitch.conf file on my Linux device, the configuration looked like this:
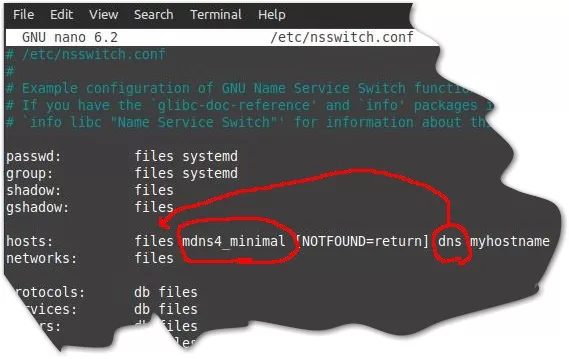
As you can see, the settings did not match Deepseek’s recommendation. After adjusting the file to prioritize mdns4_minimal as suggested, the problem was resolved!
